Are you using an ecommerce platform built in WooCommerce? Shopify? BigCommerce? Magento? If you're using Shopify and host your website on HubSpot, the greatest thing ever just happened.
That's right.
I'm talking about the new Shopify integration, recently announced by HubSpot. If Shopify isn't the platform for you, have no fear! HubSpot has a new ecommerce bridge in the works.
But long story short, it is a fantastic integration.
HubSpot really one-upped themselves. The sales data and customer information pulled into the CRM will help you grow your business exponentially.
The integration enables you to segment your customers into lists based on the products they buy, where they live, how often they make purchases, etc. It comes with pre-built abandoned cart emails and workflows. In the past, we jerry-rigged this with our infamous WooCommerce / Zapier setup, but now, there's much more to it, such as auto populating emails with products people add to their cart.
Let me just say, the new ecommerce dashboard is the best. HubSpot nailed it.
But enough about how great this integration is; you can learn more about it here.
1. Building out your product page in Hubspot
You really have two options when building your product in HubSpot. You can use Shopify's JS Buy Button and embed the script onto your website page, or build out a form that posts to your Shopify cart. We'll be setting up the latter, so feel free to skip to the next step if you're planning to use the Buy Button.
The first step is grabbing the product ID that's listed in your admin panel. When you pull up your product in the back end of Shopify, it's the number at the end of the URL.
If you're product has multiple variations, each one will have a different ID. In order to find those, you'll need to add .xml to the URL. For example: https://.../639302008874.xml and then perform a search for <id type="integer">

We'll need to write the form code that pushes the product to an externally hosted Shopify cart. Below is a simple form to get you started, and you can refer to the one we've used for a client.
Generic example
Client example
Once the form code is ready, you can add in a simple rich text module or a custom html module and build out the rest of the page.
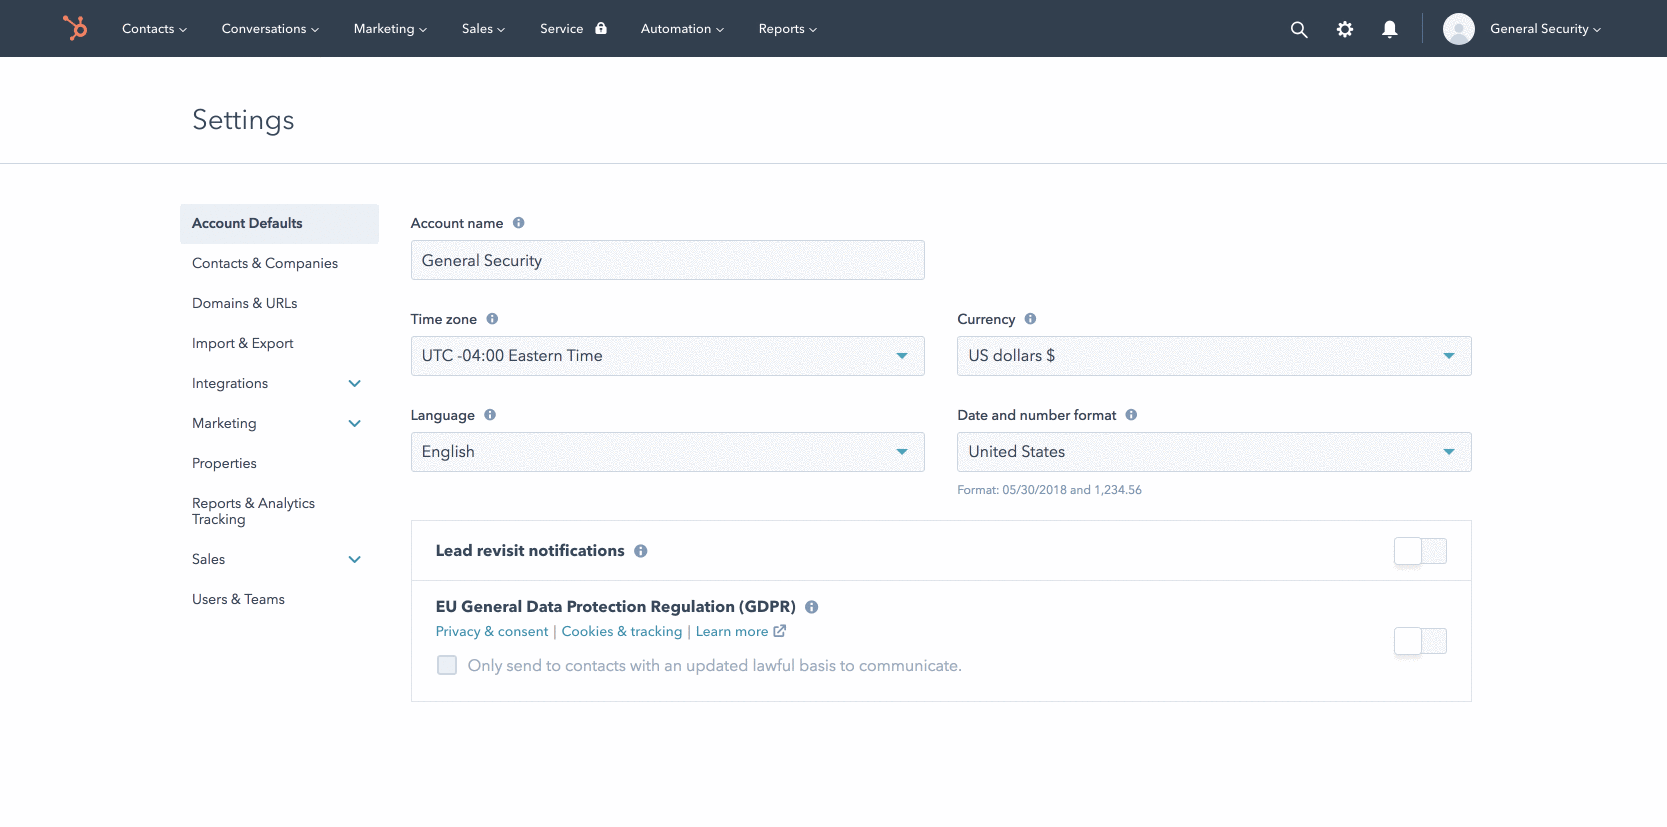
2. Installing the Shopify Integration
Installing the actual integration is simple. All you have to do is navigate to your settings, and under the "Integrations" dropdown, click "Ecommerce." You'll see the "Connect to a Shopify Store." In the modal, just enter your store's Shopify URL, and then HubSpot will work its magic and begin importing away. You'll also actually notice that there are two greyed-out options that state "Coming Soon," which will be for other Ecommerce platforms.
3. SO, WHAT now?
The new integration comes with pre-built workflows and dummy cart abandonment emails. Be sure to edit and fine-tune these emails and turn on the workflows. Maybe throw in some special incentives for customers :)
Place some test orders to check if all the customer information is pulling into the CRM, properly entering workflows, being segmented into lists, and receiving the correct emails.
Related: 'Inbound & Down' S02 E07: Inbound 2017 Takeaways: Are You Doing Email Right?
4. Going Live with your store on Hubspot
IMPORTANT! If you're planning to host your Shopify store, make sure to set up a subdomain, whether its shop.url.com or store.url.com. It took us a few weeks to find out that HubSpot and Shopify do not play nicely when trying to track the original source between different domains.
We tried placing tracking cookies everywhere on HubSpot and Shopify, and placed numerous test orders organically through our PPC channels via direct traffic and referrals, but the original source was not properly tracked within HubSpot.
We even reached out to Google for help to try and set up funnels in Google Analytics to properly track the original source until we figured out the issue.
For some reason, I didn't realize you could host a Shopify store on a subdomain, and that the store should've been set up on one using our domain. So instead of hosting it at pangeabed.myshopify.com, we updated it to shop.pangeabed.com so that both platforms are on the same domain.
Once this was properly set up, we placed numerous orders via different sources, and one by one we saw HubSpot retaining the proper original source.
I was like, "Is this happening right now?! 😲"
At first, I definitely thought it was some kind of bug, but once those organic sources starting coming through, I couldn't tell you how much of a relief it was.
This had been one of our biggest hurdles to date on ecommerce sites hosted on WordPress. Now we're finally able to see how many sales we get from programmatic spend.
Regardless of how you set up your store—whether you use my form example above or are using Shopify's Buy Button—please make sure to set up a subdomain when you're ready to go live. It will truly enable you to report properly on where your sales are coming from.
Please Note: If you're using the Shopify integration, you will not need to install the tracking code separately.
5. And that's all! Well, at least for now
You've successfully set up your first Shopify HubSpot integration.
HubSpot is always working around the clock to grow their platform—whether it's integrating with top software companies, or including new services. They have a forum where you can share your ideas for this ever-growing platform.
If you have any questions about the integration or setting up your products on HubSpot, please feel free to shoot me an email.